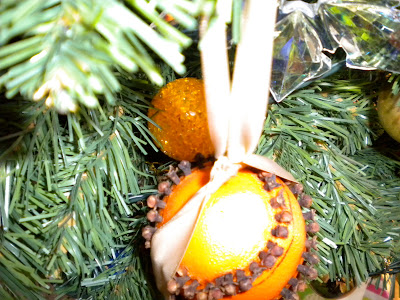
However, I thought I would share how we decorated a few of our ornaments while posting the easy instructions along the way.
Supplies Needed:
- 4 oranges, 2 for you and 2 for your guest--you can obviously make more but we have a small tree this year and I didn't want to overwhelm the poor thing
- 1 jar of whole cloves--one of the small spice jars they sell at grocery stores will be plenty for four ornaments. If you are decorating more than 4 oranges, you may want to consider buying a bigger jar, perhaps from Penzey's if you are lucky enough to have one in your area!
- Ribbon to tie off and hang your ornament from--I used scrap ribbon left over from our wedding
- Ballpoint pen for tracing and making holes--note: once you start using the pen to make the holes, it may stop working as a writing utensil. Therefore, use a pen you don't mind parting with at the end of the project
Draw your design on the orange. When I made these, I drew the design and inserted all of the cloves before tying the ribbon. You can obviously create this in the same order as I did, but I found that some of the designs I created were interrupted by the ribbon. Having the ribbon around the orange to begin with helps you visualize the space (canvas if you will) that you have to work with before you even get started.
Next, using the tip of your pen, poke a hole through the orange. The hole needs to be fairly deep so that the whole clove can fit comfortably inside it without falling out but take care not to make it too deep or the clove will start to disappear inside the orange! Insert a clove into the hole, then move on to the next part of your design, trying to keep the holes spaced evenly throughout.
The directions I read said only to use perfectly intact cloves for this project, but the whole cloves weren't exactly cheap so unless they were terribly broken, I still used them. There are enough cloves on there that one or two broken (read missing their bulb) cloves won't be noticed. Note: the broken cloves are a bit more noticeable in these photos because they are close-up shots and had been sitting on our tree for almost a week before I got around to taking pictures. Don't worry, they still smell delicious!
Repeat until finished. Hang on tree or anywhere you want a little fresh scent (like a closet or the kitchen).
I also think a tree decorated completely with oranges and baby clementines would be darling!
Anyone else have easy yet festive crafts to share? I am always looking for new projects!


No comments:
Post a Comment
Thanks for finding my blog and taking the time to leave a comment!
I try to respond to everyone's comments either below your comment itself or through email. Please be sure to link your email address to your account so we can chat!