Showing posts with label dessert. Show all posts

Thursday, July 7, 2011

Recipes: Jen's Crab Rangoon and Chocolate and Cheese Danishes

With all of the traveling we've been doing lately, I haven't spent much time in the kitchen in the last week; however, I did try Jen of Peas and Crayons (aka Woods' future mother-in-law because he and Madison are dating) Crab Rangoon last night and even managed to take some pictures.

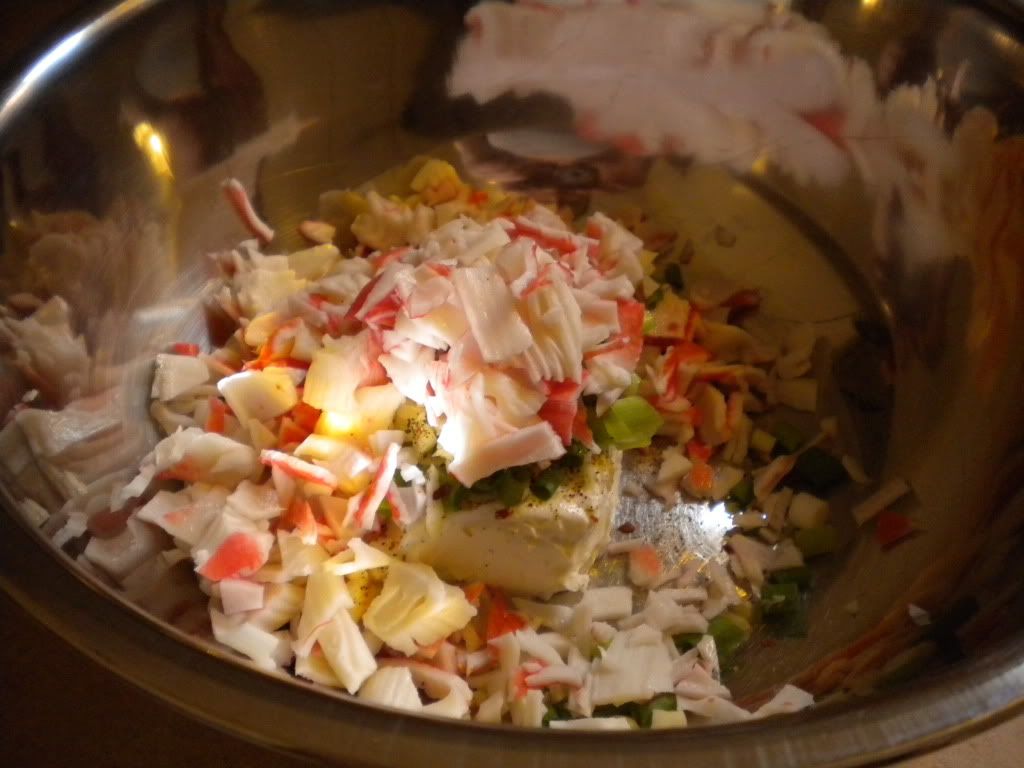
You can find the full recipe here but here's what our dinner preparation looked like last night:


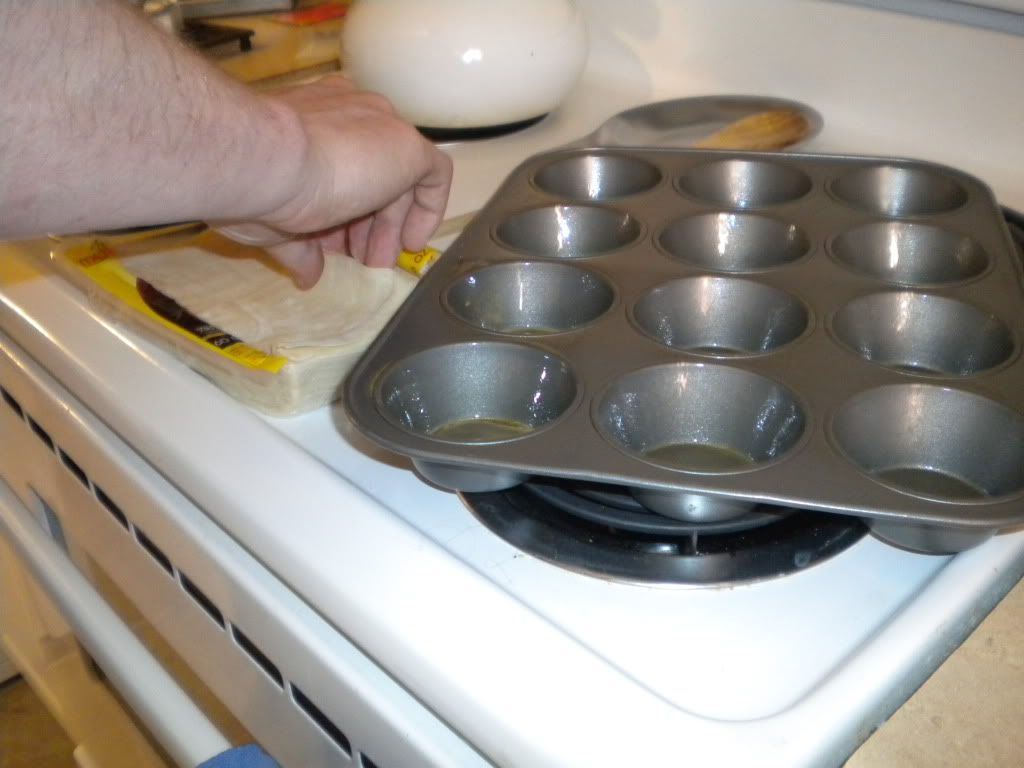
J lining the muffin tins

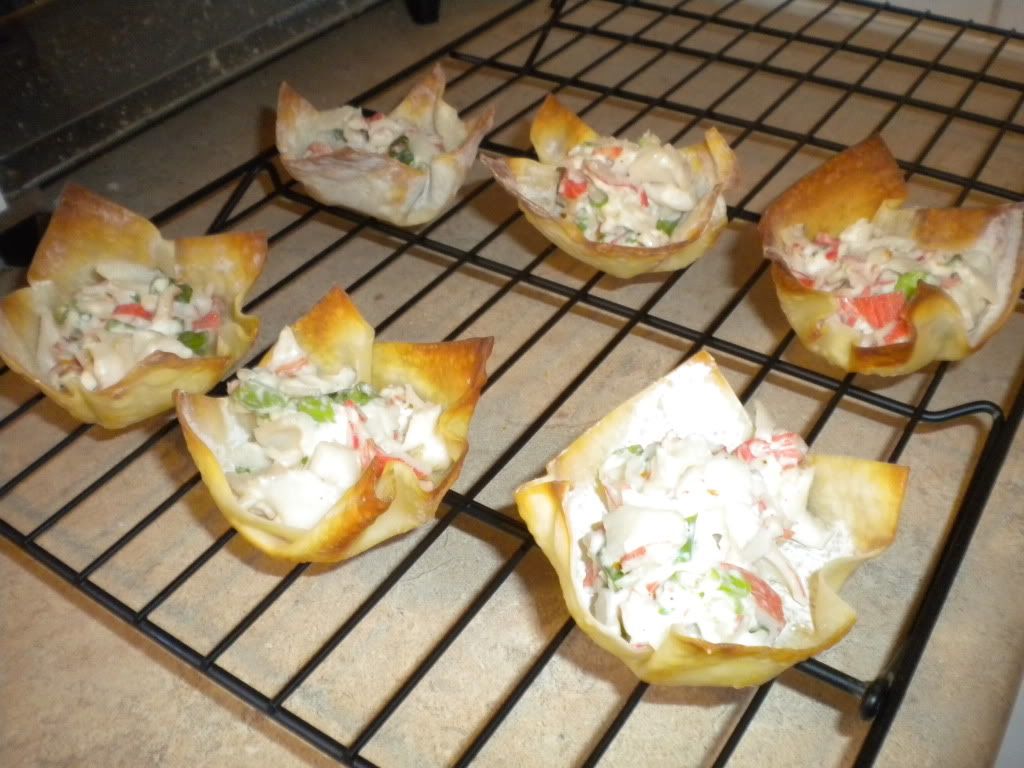
We made six open faced (pictured above) and six closed, dumpling style ones to see which way we liked better.  The open-faced variety looked prettier and were more crispy but the dumpling style ones stayed warmer longer.  We'd love to make open-faced ones for a party since the presentation is so lovely--we will just have to make sure they get eaten quickly.  Somehow I don't think that will be a problem! 


We used crab (or Krab if you want to get technical) because we also made California rolls to accompany the rangoons.   The best part was that I was able to pack a few boxes up while I made dinner, first while the rice soaked and then while it simmered away on the stove.  Woods even got in on the action.


The picture's a little grainy because I had to take it quickly from my iPhone.  Woods is notorious for running away before I can snap a picture of him (case in point: he jumped out of the box as soon as he realized what I was doing).

As I got out the cream cheese last night, I realized I hadn't shared the recipe for the cheese and chocolate danishes we had on our date night last week.  The recipe is so easy and tasty I couldn't not post it here.  I halved Giada's original recipe and made a few substitutions so that I could use what I had on hand instead of buying more ingredients at the store.  The results really got my wheels turning as to what else I could stuff inside danishes--they were that easy and that good!


Chocolate and Cheese Danishes, modified from Giada at Home

Ingredients:
1 sheet frozen puff pastry, thawed in the refrigerator for 4 hours or on the counter for 40 minutes
2 ounces reduced-fat cream cheese, room temperature
1 tablespoon vanilla yogurt--we used whole milk vanilla yogurt from Trader Joe's but fat-free would also work
1/2 tablespoon all purpose flour
1 1/2 tablespoons granulated sugar
Pinch of salt
1/4 cup chocolate chips
1 egg, beaten


Kitchen Supplies:
Cutting board
Sheet pan
Small bowl
Ramekin
Pastry Brush
Knife
Cooking spray

Preheat oven to 400 degrees.  Spray sheet pan with cooking spray and set aside.

In a small bowl, stir together cream cheese, yogurt, flour, sugar and salt, mixing until smooth.  Fold in the chocolate chips and set aside.

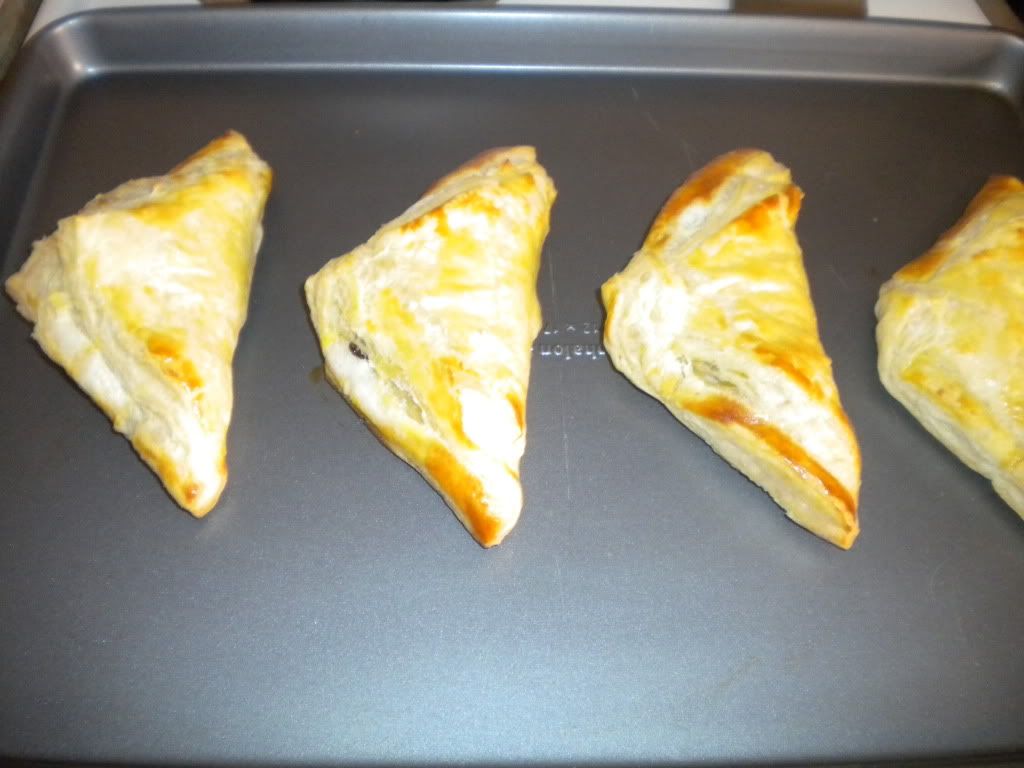
Unfold the puff pastry and cut into fours.  Spoon 2 to 3 tablespoons of the mixture into the center of each piece of pastry.  Fold one corner of the pastry diagonally over the mixture, leaving yourself a one inch border around the opposite edge.  Brush the egg wash over the folded part of the pastry.  Take the point of the triangle shape you made and fold it on top of the danish for an open-ended danish and a crisp look.  Bake in the oven for 15 minutes until golden and puffy.  Remove from oven and cool for five minutes before serving.

Serves: 4

We waited a bit longer than five minutes to eat them since we had dinner reservations before the concert.  However, they were just as good a few hours later with a glass of crisp white wine! 

Have you ever tried to make danishes?  What about sushi?  They both are definitely way easier than they look!

Friday, February 11, 2011

Blizzard Pumpkin Bread Pudding

This recipe came about because last week when the news was calling for a blizzard of epic proportions.  Fearing the worst, J and I ventured to the grocery store to stock up just in case we lost power as some were cautioning we might!  While we were there, we bought a loaf of Italian bread, not remembering the loaf and a half we had left at home. 

We didn't lose power or get the amount of snow that was originally projected, which meant we had a lot of extra bread.  Now, we don't usually eat a lot of sandwiches around here to begin with (hence the loaf and a half at home) and since then it has just been sitting there waiting for something to be done with it.

On Wednesday night, it popped into my head that I should make a bread pudding with the loaf of bread.  I cut it into cubes and dried them out a bit in the oven first, the way you would with croutons or bread when you are making homemade stuffing.  The results were definitely tasty and the bread held up pretty well considering it is sandwich bread and not baguette, which traditional bread puddings use.  I don't know if I would recommend making it this way by choice, but if you have extra bread laying around that you are going to throw out, this is a great option.

Here is the recipe either with or sans sandwich bread:

Blizzard Pumpkin Bread Pudding, adapted from Epicurious

Not my best photographic effort but I was trying to get this and dinner on the table before going to the laundry mat!
Ingredients:
5 cups of cubed crusty bread, like French baguette--I used Italian sandwich bread (see above)
1 cup of heavy cream--I used half and half to cut down on some of the calories
1/2 cup whole milk--I used skim milk to make it less caloric (less calories per bite equals more bites!)
3/4 cup canned pumpkin
1/2 cup sugar
2 large eggs plus 1 yolk
1/4 teaspoon salt
1/2 teaspoon ground cinnamon
1/4 teaspoon ground ginger
1/8 teaspoon ground allspice--I used nutmeg because I didn't have any allspice
3/4 of a stick of margarine, melted


Kitchen Supplies:
2 mixing bowls
Whisk
2 quart glass baking dish
Measuring cups and spoons

Preheat oven to 350 degrees.  Melt butter either in a saucepan on the stove or in the microwave. 
In one bowl, whisk together cream, milk, eggs, pumpkin, sugar and spices.  In another bowl toss the butter and bread cubes together until combined.  Pour bread cubes into the milk and egg mixture, tossing to coat.  Pour mixture into ungreased baking dish and bake uncovered for 25 to 30 minutes until the custard is set.  Remove from oven and serve.

Serves: 6

Have you ever had leftovers that were going to spoil that caused you to improvise?  What was it and what did you make?

Monday, February 7, 2011

Blackberry Pie and Guacamole, or the Super Bowl Game

As I mentioned in this post, we made blackberry pie and guacamole for the Super Bowl party we attended yesterday.  When we were at Sam's Club last week, J suggested that we make a fruit pie for the party.  The blackberries there looked really good, so that quickly settled what type of fruit pie we were going to make!  

I love making fruit pies so when J asked for one, I was happy to oblige.  Traditionally he is more of a fan of cream pies, but because I can never get them to set up properly I do not enjoy making them nearly as much!

Blackberry Pie, as taken from Better Homes and Garden's New Cookbook


Ingredients:
For the Crust:
2 1/4 cups all-purpose flour
3/4 teaspoon salt
2/3 cup shortening
8 to 10 tablespoons of cold water--I used 9 tablespoons

For the Filling:
5 cups of fresh or frozen blackberries
1 cup of sugar
1/3 cup flour
1/2 teaspoon ground cinnamon

Kitchen Supplies:
Pastry blender (I used two knives) to cut the shortening
2 glass bowls
Pie pan
Rolling pin
Paring knife
Pastry brush

Preheat oven to 375 degrees.  Mix together flour and salt together in a glass bowl.  Using a pastry blender, cut in shortening until the pieces of shortening are about pea size.  Sprinkle 1 tablespoon of water over the flour mixture, tossing with a fork.  Push moistened mixture to side of bowl.  Repeat moistening mixture using 1 tablespoon at a time until flour mixture is completely moistened.  I found the best way to do this next part is to measure 10 tablespoons of cold water into a larger measuring cup then pouring out a little at a time, instead of walking back and forth to the sink.  Divide pastry in half, forming the halves into balls.  


On a lightly floured surface, slightly flatten one pastry ball.  Roll it out from the center to edges into it is approximately 12 inches in diameter.  Wrap pastry around the rolling pin and unroll in a 9 inch pie pan.  Ease pastry into pan without stretching it and trim so that there is no pastry hanging over the sides.

Next, combine remaining sugar and flour in a glass bowl.  Stir in berries and cinnamon.  Gently toss berries until coated.  If you are using frozen blackberries, allow mixture to stand for forty-five minutes or until fruit is partially thawed but still icy).  Transfer berry mixture into pan.


Roll out second pastry ball, using the same method as above.  Place pastry on top of the mixture, trimming with a paring knife any pastry that hangs more than 3/4" off the pie pan.  Crimp edges as desired and cut four slits in the top of the pie.  I used some of the excess pastry to create three little leaves to top the pie.  Brush the top of the pie with a little milk then sprinkle with sugar.


Cover the edges with foil and bake for twenty five minutes.  Remove foil and bake uncovered an additional twenty-five minutes or until the filing is bubbly and pastry is golden.  Cool on a wire rack and serve.


Pear and Habanero Guacamole--Sadly, I do not have any pictures of this guacamole but trust me, it is delicious.  While habaneros are a very spicy pepper, the grated pear cools it quite a bit, leaving behind the flavor of the pepper without the spice, and this is coming from a girl who doesn't like really spicy food!

Ingredients:
1 habanero pepper--we found ours at Whole Foods, minced finely
4 ripe avocadoes, peeled and cubed
juice of 1 lime
1/2 of a red onion
1/2 of a fresh pear, grated--we use a box grater to get a finer grade without a lot of extra work
1 tablespoon cilantro
Salt 
Pepper
Chips for dipping

Kitchen Supplies:
Box grater
Cutting boards
Knife
Glass bowl
Potato Masher

Combine lime juice, habaneros and onions in the bottom of a glass bowl.  

Take extreme caution when handling the pepper.  Use gloves if necessary and handle the pepper with your hands as little as possible!  I usually have J do this part because 1) he is less sensitive to spicy foods and 2) he is more meticulous and careful about not getting the juices on his fingers!  You will want to wash anything that comes in contact with the juice thoroughly.

While this marinates a little, peel and cube the avocado.  Toss with mixture, adding pear, cilantro, salt and pepper.  Mash to desired consistancy.  Adjust seasonings as necessary (adding more pear if it is too spicy, more salt and pepper, etc)  Garnish with more cilantro and serve with chips.

 What did you have for Super Bowl Sunday this year? 

Thursday, January 27, 2011

Zucchini Bread Muffins

After reading Courtney's post yesterday about zucchini brownies, I realized I had a zucchini at home that was also on the verge of going bad and needed to do something about it pronto.

You see, I have begun taking a muffin and hard boiled egg to work for breakfast every morning because it's quick and easy.  This has made my morning routine much smoother and ensures I don't stop somewhere like Starbucks to get breakfast!  Last week I made pumpkin muffins (boxed from Trader Joe's) and I just finished the last one, so I decided to make zucchini bread muffins because one, the zucchini was going to go bad and two, because I love zucchini bread.

Zucchini Bread Muffins, modified from this recipe

Ingredients:
2/3 cup vegetable oil
2 large eggs
2/3 cup granulated sugar
1/2 cup brown sugar, packed--I used the Splenda brown sugar blend
1 teaspoon vanilla extract
2 cups all-purpose flour
1/2 teaspoon baking powder
1/2 teaspoon baking soda
1/2 teaspoon salt
1 1/2 cups shredded zucchini--about 1 medium
1/2 cup walnuts
1/3 cup golden raisins


Kitchen Supplies:
(1) dozen cupcake pan
Mixing bowls
Spatula
Cooking spray
Cooling rack

Preheat oven to 375 degrees.  Combine oil, eggs, sugars and vanilla.  In a separate bowl, sift together the dry ingredients (flour, baking powder, baking soda, salt).  Slowly folded in the dry ingredients.  Once combined add zucchini, walnuts and raisins.  Fold in.


Spray cupcake pan with cooking spray.  Spoon 2-3 tablespoons of mixture into each well, until about 2/3  full.  Bake for twenty to twenty-five minutes until toothpick inserted into the center of the muffin comes out clean.  Remove from oven, place on cooling rack and enjoy!

What's your current breakfast routine?

Friday, January 7, 2011

Bananas Foster Bread Pudding

Now for my favorite part of any meal (except maybe those lambsicles), dessert!  And what is better than dessert, you ask?  Bread pudding for dessert because it is my absolute favorite dessert.  Ask J, if we are out to dinner and that is a choice for dessert, it doesn't matter what else is on the menu because I will go for bread pudding every time.

This bread pudding was no exception and a great way to cap off our NOLA themed night.  Sadly, I didn't get a picture before I devoured it (despite having ate six previous courses) but trust me, it's good!

Bananas Foster Bread Pudding

Ingredients:
3/4 cup sugar
2 tablespoons water
1/2 teaspoon lemon juice
1/2 cup heavy cream
1/4 cup milk
9 tablespoons unsalted butter
1 1/2 cups light brown sugar
3/4 teaspoon ground cinnamon
6 bananas, cut 3/4 inch thick
1/4 cup banana liquor
1/2 cup dark rum
4 large eggs, beaten
3 cups heavy cream
1 cup milk
1 teaspoon vanilla extract
pinch salt
6 cups bread cubes--we used day old french baguette and it was fantastic!


Kitchen Supplies:
Bread knife, for bread cubes
Heavy saucepan
Whisk
10 x 14 inch baking dish
Large skillet
Lighter stick or match
Wire rack, for cooling

Combine sugar, water, and lemon juice in a heavy saucepan over medium heat and cook until sugar dissolves.  Let boil without stirring until it becomes deep amber color, 2-3 minutes.  Carefully add cream whisking to combine and remove from heat.  Add milk, 2 tablespoons at a time until desired consistency is reached.  Let cool.

Preheat oven to 350 degrees.  Butter a 10 x 14 inch baking dish with 1 tablespoon of butter and set aside.

Melt remaining 8 tablespoons of butter in a large skillet over medium heat.  Add 1 cup of the brown sugar and the cinnamon and cook until the sugar dissolves, about 2 minutes.  Add the bananas and cook on both sides until the bananas begin to soften, and brown about 3 minutes.  Add the banana liquor and stir to blend.  Carefully add the rum and shake the pan to flame the rum.  Shake the pan back and forth until the flame dies.  Remove from heat and cool.  Let me let you in on a little secret: when we made this, the pan did not flambe (light) and you know what, it turned out great!  So if you make this recipe and yours does not ignite, not to worry.  It will still taste wonderful!

Whisk the eggs and add the remaining 1/2 cup brown sugar, the cream, milk, vanilla and salt in a bowl.  Add the cooled banana mixture and bread and stir until blended thoroughly.  Pour into the prepared baking dish and bake until firm, about 50 minutes.  Cool on a wire rack for 20 minutes.  Serve a scoop of pudding on a plate and top with vanilla ice cream and drizzle with caramel sauce.

Serves: 10

And that concludes my NYE recipe round-up.  Now go out there and try some of these recipes.  You will not regret it!  And as always, please let me know if you try them.

Happy weekend, everyone!

Wednesday, December 22, 2010

Pumpkin Bars recipe, or We Have A Lot of Leftovers

As I mentioned in this post, I made Pumpkin Bars this weekend for our dinner with JY and Ashlee.  I knew I wanted to make a dessert for them and when I thought about all of the dessert recipes in my repertoire and which I would like to make this weekend, Pumpkin Bars immediately came to mind.

You see, when I was growing up my mom would bake us a cake of our choice for our birthday every year.  As I detailed in this post, my mom is not big on baking, so this was a very nice gesture!  While my siblings would choose confetti or chocolate cake, my dad and I always chose Pumpkin Bars for our birthdays.  I loved them so much my mom even figured out how to mail them to me my first year of college!  Even before all that, my grandma (whose recipe this is and of Grandma D's Sugar Cookie fame) used to make these for my dad when he was young and I believe he brought some back from her to college too!

They are delicious and instantly remind me of all the great birthdays I've spent with my family over the years.  I hope you enjoy them as much as we have!

Pumpkin Bars

Ingredients:
4 eggs
1 cup vegetable oil
2 cups of sugar
15 ounce can of pumpkin
2 cups of flour
2 teaspoons baking powder
1 teaspoon baking soda
1/2 teaspoon salt
1/2 teaspoon ground ginger
2 teaspoons of cinnamon
1/2 teaspoon cloves
1/2 teaspoon ground nutmeg


Frosting:
4 ounces of cream cheese (usually half of a regular box of cream cheese), softened
3/4 stick of margarine, softened
1 tablespoon milk
1 teaspoon vanilla
4 cups of powdered sugar


Kitchen Supplies:
Handheld mixer or stand mixer
Cookie sheet (my grandma's original recipe calls it a jelly roll pan)
Sieve for sifting
Medium size bowl for dry ingredients

Preheat oven to 350 degrees.  In a medium bowl, sift together flour, baking powder, and baking soda.  Add ginger, cinnamon, cloves and nutmeg to dry ingredients.  Next, mix eggs, vegetable oil, sugar and pumpkin well.  Slowly add dry ingredients to wet, stirring to combine.  Pour into a 12 x 18 pan (see notes above) and bake for twenty five to thirty minutes until toothpick, when inserted, comes out clean.

Allow to cool.  Combine cream cheese, margarine, milk, vanilla and powdered sugar.  Beat well until creamy and smooth.  Spread over top of cooled bars and serve.

This makes a lot of food.  On Sunday we each had two pieces and J and I have been eating some for dessert for lunch and dinner (and breakfast one day) every day this week and we still have a ton left over, hence the title of this post.

Alas, I didn't get any pictures of the finished product before we dug in, but trust me, it's great. As always, please let me know if you try the pumpkin bars and if you end up loving them as much as I do!

Wednesday, October 13, 2010

Weekend Wrap-up, mid-week

There has been blog silence due to an upcoming event at work that has had me working until at least 7 every night this week.  I have not abandoned you, I promise!  I will be back with recipes, book reviews, my Bedroom makeover wrap-up and more in the upcoming days and weeks!!

In the meantime, here is a little recap of my weekend festivities and a yummy family recipe that we made this weekend!

Apple picking in 89 degree weather just didn't seem right.  Instead, we went and got ice cream at The Fountain on Locust which was delicious!  The decor is very Art Deco and the drinks remind me of Mad Men.  We tried their ice cream which is shipped straight from a family dairy in Wisconsin!

I had butter pecan ice cream in their signature pretzel cone.  The combination of sweet and savory was amazing!  J had a malt topped with fresh whipped cream, which was also very good.

They even candy their own lemon peels there--I definitely recommend it to anyone in the area!

On Saturday I made Halloween sugar cookies with a girl I mentor.  We made ghosts, pumpkins and star cookies.  Here's the recipe:

Grandma's Halloween...err Christmas...Cookies

Ingredients:
1 cup shortening
2 cups of sugar
3 eggs, room temperature
1/4 cup of milk
4 cups of flour
1/2 teaspoon salt
1 1/2 teaspoons vanilla
1/2 teaspoon almond extract
1 teaspoon baking powder

For the frosting:
1/3 cup butter, softened
1/4 cup of milk
3 cups powdered sugar, sifted
pinch of salt
1 teaspoon vanilla


Kitchen Supplies:
Various cookie cutters
Hand or stand mixer
4 baking sheets
Food coloring
Small bowls for mixing colors, I used our ramekins
Sprinkles, optional
Tupperware and freezer paper for storage


Sift dry ingredients together in a small bowl.  Cream shortening and salt with either a hand or stand mixer.  Crack eggs, one at a time, into a small bowl and add to the batter, continuing to cream with the mixer.   This helps ensure one bad egg doesn't run the whole batter! While mixer is running, add milk and sifted ingredients until the mixture has come together.  Add vanilla and almond extract and mix well.  Cover with plastic wrap and chill in the refrigerator for at least twenty minutes.

Remove a small portion of dough from the refrigerator and roll out to 1/8 to 1/4 inch thickness on a floured surface.  Coat cookie cutters lightly with flour, press into dough and place shapes on an ungreased sheet pan.  Repeat process until all dough has been used.  Note that by keeping the dough you are not working with in the refrigerator, it rolls out much easier.

Bake at 375 degrees for 9-10 minutes.  Do not allow the cookies to brown.  Place on cooling racks or brown paper bags to cool.

Next, cream thoroughly butter, salt and 1 cup of powdered sugar until light and fluffy.  Add remaining sugar and milk, alternating blending until smooth and of blending consistency.  Add vanilla.  Mix well.  Spoon equal amounts into small bowls.  Add food coloring and mix well.  Decorate to your heart's content.

Store in airtight Tupperware containers with freezer or contact paper between layers.  Makes approximately two dozen cookies.


My grandma (my Dad's mom) usually makes these around Christmas time, but they work just as well any other time of year!

Buy a cookie cutter like this and make a batch for a new neighbor.  Surprise your sweetheart with some sweet treats on Valentine's Day or an anniversary with a cookie cutter like this.  Or make some cookies for a baby or wedding shower.  Any way you cut them, they are great cookies! Enjoy!

Tuesday, October 5, 2010

Shamrock Carrot Cake Cupcakes

This weekend I made carrot cake cupcakes to bring to my cousin's house for the Notre Dame-Boston College came on Saturday night.

Notre Dame finally won a game, but sadly it was not on TV.  No matter, we had a great night with my cousin and her husband eating chili, cornbread and carrot cake cupcakes and talking and laughing together.  I wanted to share the recipe because it was delicious and because I had a such a fun time decorating the cupcakes!

Shamrock Carrot Cake Cupcakes, modified from Joy of Baking's Carrot Cupcake

Ingredients:
For the Batter:
2 cup all purpose flour
1 1/2 teaspoons baking soda
1 1/2 teaspoons ground cinnamon
4 large eggs, room temperature
1 cup granulated sugar
1 cup vegetable oil
2 cups grated carrots, approximately 3-4 carrots depending on their size
1 cup grated apple, approximately 1 large apple
1/2 cup walnuts--you can also use pecans or omit for nut allergies
1 cup raisins--I used golden raisins because of the color they add to the cupcakes


For the Cream Cheese Frosting:
1/2 cup of butter, room temperature
8 ounces (1 package) of cream cheese, room temperature
3 cups confectioners' sugar (powdered sugar), sifted
1 teaspoon vanilla extract


Kitchen Supplies:
20 paper or foil muffin cups
1 toothpick for testing doneness of the batter
2 pipe bags and tips for frosting cupcakes and creating shamrocks
Green food coloring
2 24-cup muffin tins

Preheat oven to 350 degrees.  Fill muffin tins with 20 muffin cups.   In a small bowl, whisk together sifted flour, baking soda, salt and cinnamon.  In a larger, separate bowl combine 4 eggs, sugar and oil until slightly thickened.  Fold dry ingredients into wet ingredients until incorporated.  Fold in shredded carrots, apples, raisins and walnuts.  Spoon into muffin cups, dividing evenly between the 20 cups.  Bake for 20 minutes or until a toothpick inserted in the center of a cupcake comes out clean.  Cool on wire racks.

Once cool, combine butter and cream cheese in a small bowl with a hand or stand mixer.  Beat until smooth.  Gradually add sifted powdered sugar until smooth and creamy.  Beat in vanilla extract.  Spoon approximately three-fourths of the frosting into a pipe bag and pipe onto cupcakes.  Add two to three drops of green food coloring and mix well.  Add remaining green food coloring to other pipe bag.  Pipe three connected circles and a stem to make shamrocks.  Unwrap and enjoy!

Sunday, August 15, 2010

Baked Goods Taste Better Shared Among Friends

We had a pint of blueberries sitting in our refrigerator for awhile now. We brought them back from South Haven, MI where we visited family and friends and have been trying to think of what to do with them! My first thought was to can it as some sort of preserve or jam, but after further research, I realized you need a lot more than a pint to do that! Because we recently made a peach cobbler, I ruled out another berry cobbler/crisp.

I finally settled on Blueberry-Sour Cream Dessert, another recipe from my trusty BHG New Cookbook. This recipe was perfect because I had all the ingredients (save quick cooking tapioca) on hand and we had the perfect amount of blueberries for the dish!

Blueberry-Sour Cream Dessert, taken from Better Homes and Garden New Cookbook

Ingredients:
1 recipe Dessert Crust (see below)
3 cups blueberries (I used fresh but you can also use frozen if necessary)
1/3 cup sugar, plus 1/2 cup divided
3 tablespoons quick cooking tapioca

1/4 cup water

1 teaspoon ground cinnamon

1 teaspoon finely shredded lemon peel

1/4 teaspoon ground nutmeg

3 egg yolks, slightly beaten

2 1/2 cups dairy sour cream

1 teaspoon vanilla


For the Dessert Crust:
1 stick butter or margarine
1/4 cup sugar
1/2 teaspoon baking powder
1/4 teaspoon salt
1 egg yolk
1 1/2 cups flour


Kitchen Supplies:
Spring Form pan
Cooling rack
Rolling pin

Preheat oven to 400 degrees. Beat 1/2 cup of butter with electric mixer on medium to high speed for 30 seconds. Beat in sugar, baking powder, and salt. Add egg yolk and beat until combined. Slowly add flour until ingredients combine. Work mixture gently with hands until it resembles coarse crumbles. Press mixture into 9 inch springform pan, covering the bottom of the pan completely and the sides approximately 1 1/2 inches along the side of the pan. Bake for 10-12 minutes (my oven took 10 minutes) until the edges are light brown. Place on cooling rack and let cool while you prepare the topping.

Reduce heat to 350 degrees. In a medium saucepan, combine blueberries, 1/3 cup of sugar, tapioca, water, cinnamon, lemon peel, and nutmeg. Because my blueberries were freshly picked from a farmer's market, I had to remove several stems before adding to the saucepan! Let sit, off heat, for fifteen minutes to let flavors combine. Cook and stir mixture over medium heat until blueberries begin to burst and mixture is bubbly. Pour into baked crust.

Meanwhile, combine egg yolks, sour cream, 1/2 cup sugar, and vanilla in a mixing bowl. Carefully pour over blueberry mixture, taking care that it is distributed evenly over the blueberry layer.

Bake 50 minutes in oven, or until sour cream layer is set enough that it does not budge when gently shaken. Cool in pan on wire rack for one hour. Run sharp knife along side of pan to release crust; remove side. Cover and chill in refrigerator overnight before serving.

I originally made the dessert for J and I to enjoy throughout the weekend. However, two situations presented themselves which allowed us to not only eat it, but share it with friends! Saturday morning we had coffee (both hot and iced varieties) at a friend's home. Cold blueberry dessert was a perfect addition to the affair. Saturday night we were invited to another friend's house for some Cincinnati chili. Our contribution was beer and this dessert.

I hope you consider making this dessert yourself and sharing it with family and friends! Happy weekend!

Sunday, July 25, 2010

Peaches and Cream

With the first full weekend that J has been back since even before our wedding, we decided to spend part of yesterday picking peaches at a local U-pick farm. One hay-rack ride and many minutes eating peaches fresh off the trees and occasionally filling our basket later, we had six pounds of peaches that we needed to consume over the next few days.

Enter the trusty Better Homes and Gardens New Cookbook Bridal Edition (my old stand-by) and a recipe for peach cobbler. Currently, the kitchen smells delicious and we are anxiously awaiting the fruits of our labor (pun intended).


Peach Cobbler, taken from Better Home and Gardens New Cookbook

Ingredients:
1 cup all-purpose flour
2 tablespoons sugar, plus 1/2 to 2/3 cup of sugar for peach filling
1 1/2 teaspoons baking powder
1/4 teaspoon salt
1/2 teaspoon ground cinnamon (New Cookbook calls it optional, I say it is necessity)
1/4 butter or margarine
5 cups unsweetened, peeled, sliced peaches
1 tablespoon corn starch
1 egg
1/4 cup milk


Kitchen Supplies:
2 quart glass baking dish
Small saucepan


Preheat oven to 400 degrees. First, mix dry ingredients for topping. In a medium bowl, stir together flour, 2 tablespoons of sugar, baking powder, salt and cinnamon. Cut in a half a stick of butter with either a pastry knife or in my case, two butter knives working together until mixture has a course crumb-like texture. Set aside.

Next, peel and slice your peaches. Some of our peaches were a little under-ripe, which is why we opted to use 2/3 of a cup of sugar when creating the filling. Add the sugar, 1/4 cup of water and cornstarch to a medium sauce pan. Heat over medium heat and stir occasionally until the peaches release their juices and the sauce begins to thicken. Once the mixture begins to bubble over the surface, it is ready to be placed in a 2 quart glass baking dish.

Meanwhile, mix 1/4 cup of milk and egg together in a small bowl--I used a large measuring cup that I had measured out the milk in to combine the ingredients so as to minimize the dishes I got dirty. Slowly combine with dry topping ingredients, stirring just until combined.

Pour peach filling in the bottom of baking dish and distribute six mounds of topping equally over the filling. The topping will slowly spread out to cover most, if not all, of the dish. Bake for 20-25 minutes until the topping is golden brown. In our oven that meant 24 minutes. Let cool.


Our peaches and cream cat, Woods, rested while we worked. That's okay though, because he can't eat our finished product, as much as he would probably like to...


And, the finished product, which we are sampling as soon as I finish this post.